
Authentication Made Easy with IdentitySuite
Secure Your SPA (Angular, React, Blazor) with OpenID Connect & IdentitySuite
If you're building a Single Page Application (SPA) with Angular, React, or Blazor WebAssembly, securing it properly is non-negotiable. The OAuth 2.0 Authorization Code flow with PKCE (Proof Key for Code Exchange) is the gold standard for SPAs—preventing attacks like token theft while keeping user data safe.
But let's be honest: setting up an OpenID Connect (OIDC) server can be daunting. Between configuring endpoints, managing keys, and ensuring compliance, it's easy to get lost in complexity.
That's where IdentitySuite comes in.
With IdentitySuite, you can deploy a production-ready OIDC server in minutes—no PhD in security required. In this guide, we'll walk you through:
- Why the Authorization Code + PKCE flow is the only secure choice for SPAs.
- Setting up IdentitySuite as your OIDC server with minimal configuration.
- Configuring SPA clients (Angular, React, Blazor WebAssembly) to authenticate seamlessly.
- Best practices to avoid common security pitfalls.
By the end, you'll have a fully authenticated SPA, minimal boilerplate code, and more time to focus on what matters: building great features. Let's dive in!
1. Why Authorization Code + PKCE is the Only Secure Choice for SPAs
"The Implicit Flow Trap (and Why You Should Avoid It)"
⚠️ Security Alert:
"If you've ever googled 'SPA authentication', you might have seen outdated guides recommending the Implicit Flow. This method is now deprecated by OAuth 2.1 due to serious security risks like token leakage in browser history and referrer headers."
Why PKCE is Essential for Modern SPAs:
- Mitigates authorization code interception attacks - Even if attackers steal the authorization code, they can't exchange it for tokens without the code verifier.
- No client secrets required - Critical for SPAs where all frontend code is publicly accessible.
- Compliant with modern standards - Required by OAuth 2.1, FAPI (Financial API), and recommended by OWASP.
- Works seamlessly with mobile apps - Perfect for hybrid scenarios where you need both web and mobile clients.
💡 Pro Tip:
PKCE transforms your SPA into a "confidential client" without storing secrets. The dynamically generated code verifier acts as a temporary secret that only your app knows.
The PKCE Flow in Action:
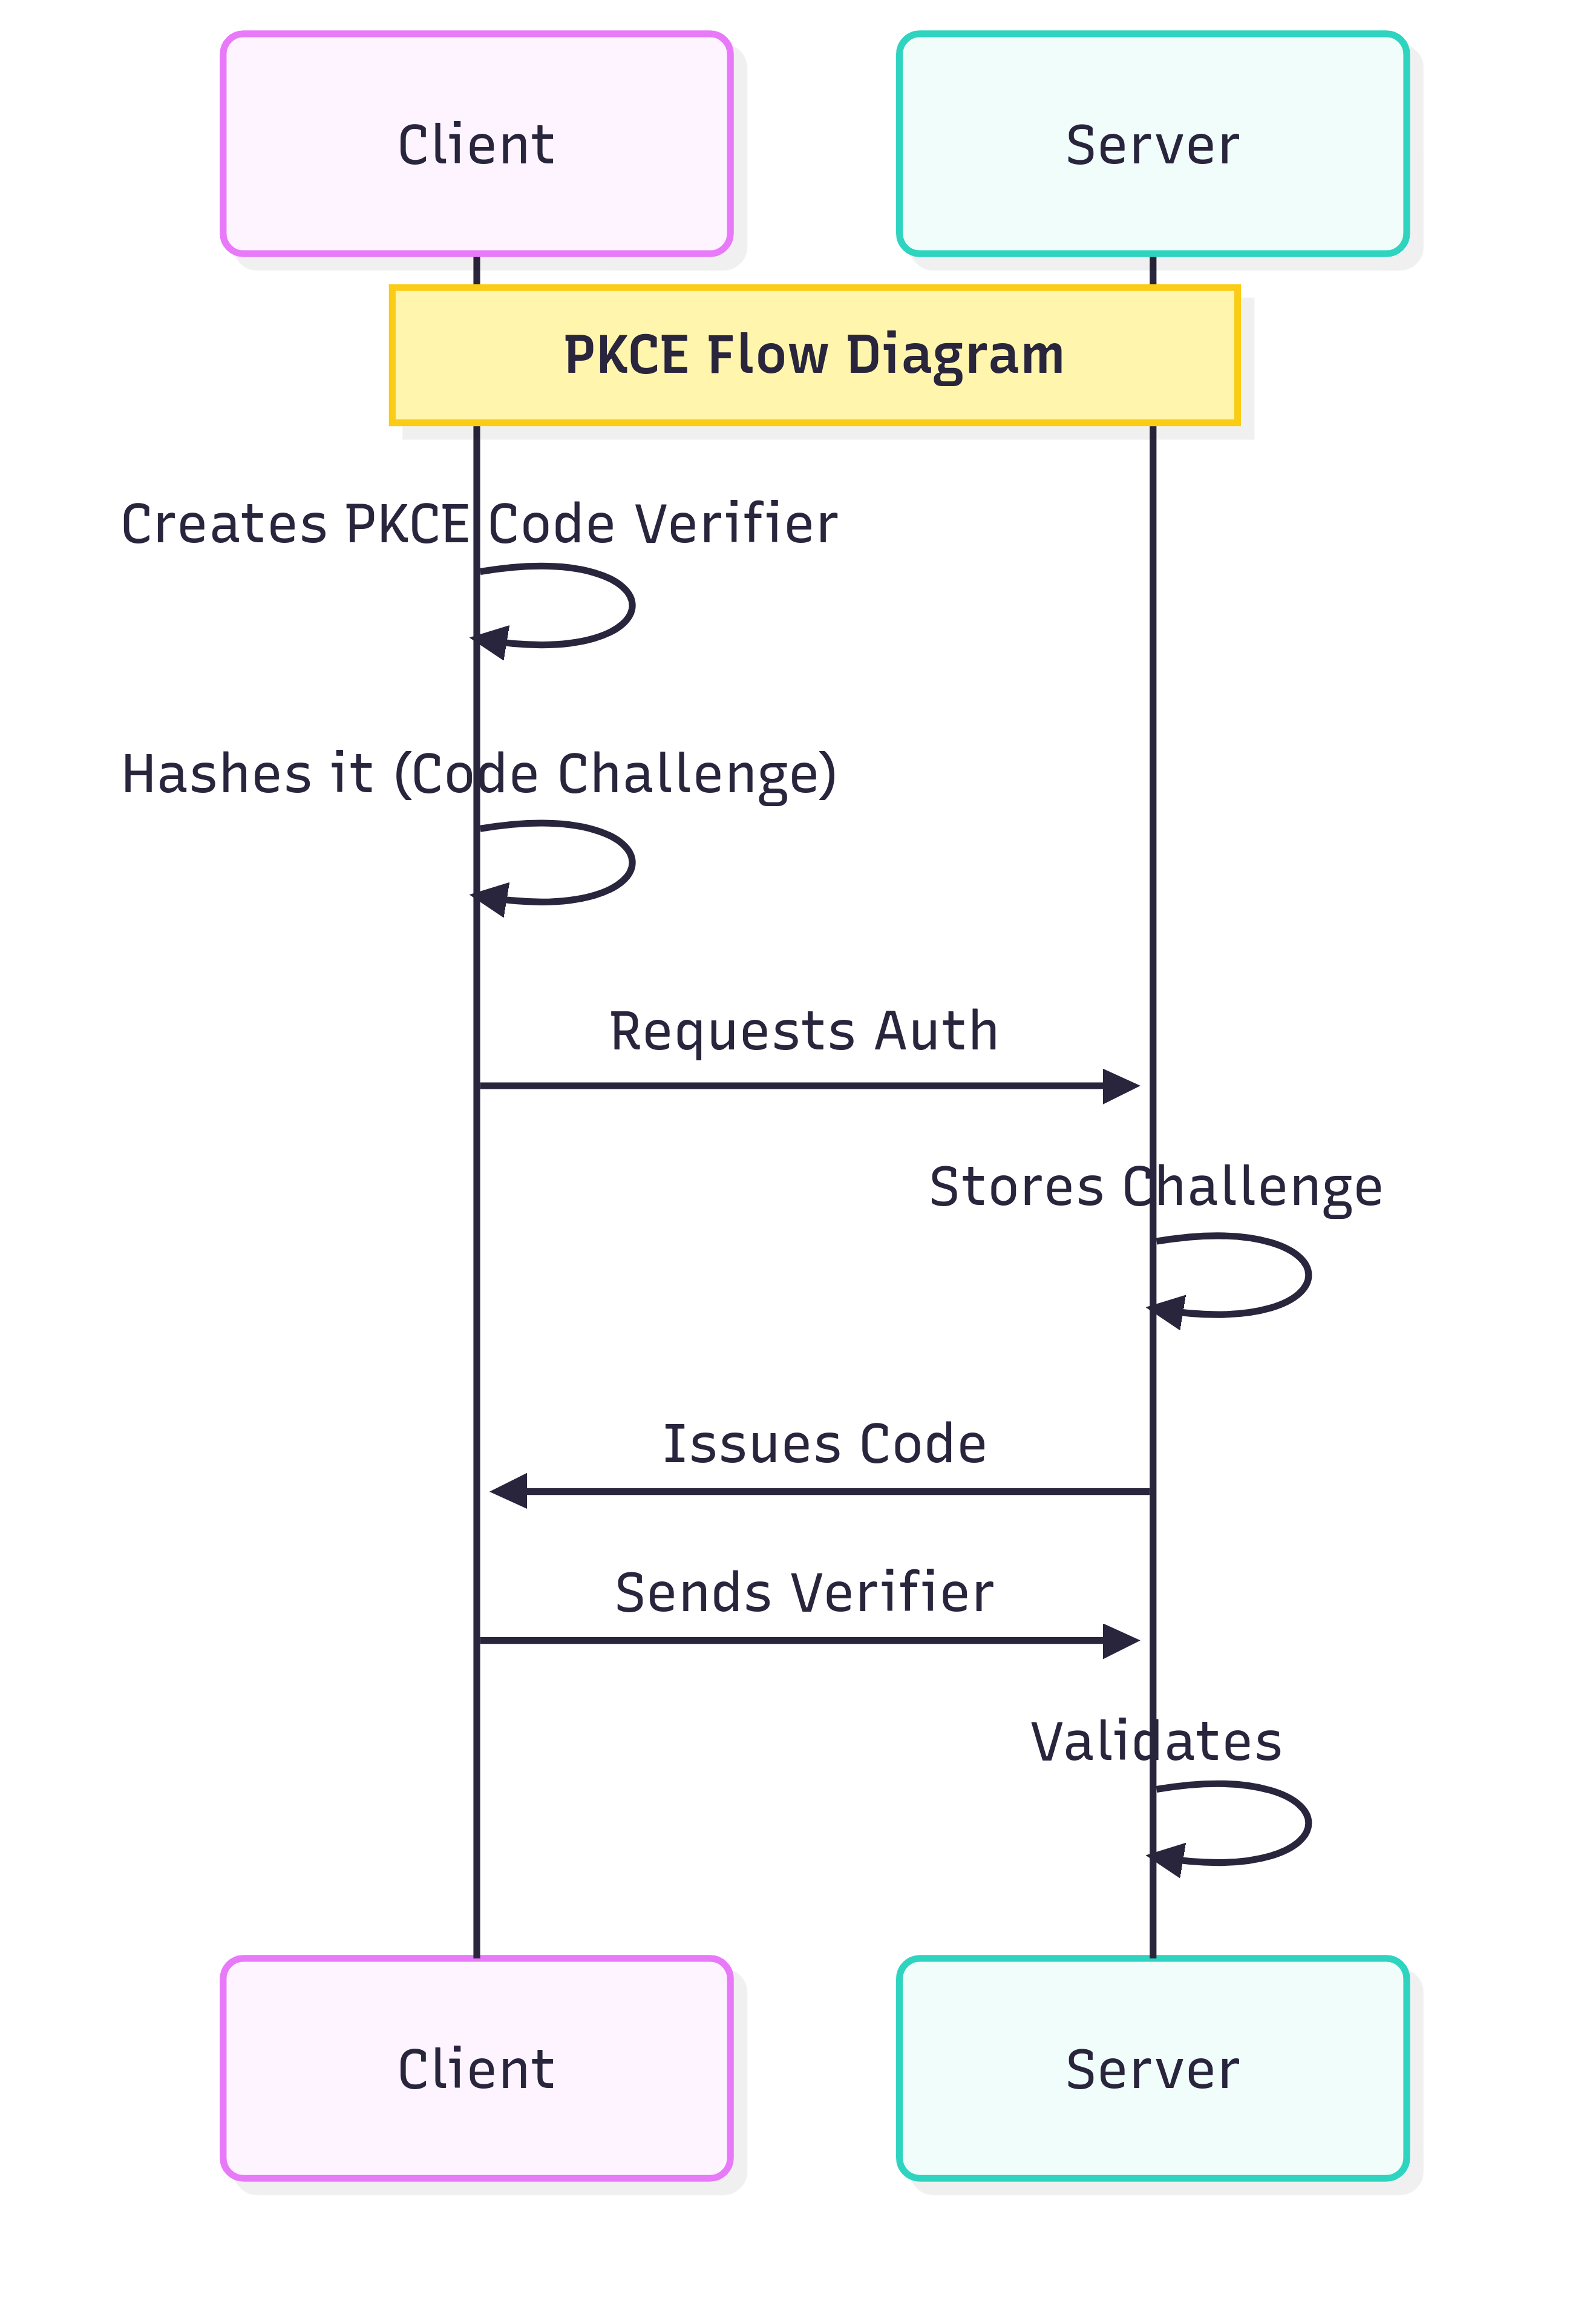
PKCE flow: Your SPA generates a code challenge, exchanges it securely, and receives tokens without exposing secrets.
2. Setting Up IdentitySuite as Your OIDC Server
"From Zero to Production-Ready OIDC in 5 Minutes"
IdentitySuite eliminates the complexity of manual OIDC configuration. Built on top of Openiddict and ASP.NET Core Identity, it provides enterprise-grade security with developer-friendly simplicity.
🚀 Quick Start:
Follow these essential steps to get your OIDC server running. For complete details, visit our comprehensive documentation, specifically the Getting Started section.
Step 1: Create Your Project
dotnet new blazor -o IdentitySuite --empty --interactivity Server --all-interactiveStep 2: Install IdentitySuite
dotnet add package IdentitySuite
# Choose your database provider:
dotnet add package IdentitySuite.EntityFrameworkCore.SqlServer
# OR PostgreSQL: dotnet add package IdentitySuite.EntityFrameworkCore.PostgreSql
# OR MySQL: dotnet add package IdentitySuite.EntityFrameworkCore.MySql
Step 3: Configure Your Database
Edit the configuration file in the IdentitySuite directory:
IdentitySuiteSettings.Development.json
"ConnectionStrings": {
    "SqlServerConnection": "Server=(localdb)\\mssqllocaldb;Database=IdentitySuiteDb;Trusted_Connection=true;"
  },
  "Initialize": true
⚙️ Configuration Notes:
- Set
"Initialize": truefor automatic database setup - Match your connection string to your chosen database provider
- For MySQL, include
AllowUserVariables=truein the connection string
Step 4: Minimal Program.cs Setup
using IdentitySuite;

var builder = WebApplication.CreateBuilder(args);

// 1. Registers all required services (authentication, authorization, etc.)
builder.AddIdentitySuiteServices();

var app = builder.Build();

// 2. Creates/updates the database based on configuration
await app.SetupIdentitySuiteDbAsync();

// 3. Enables all runtime services (authentication, routing, etc.)
app.UseIdentitySuiteServices();

await app.RunAsync();
🎯 That's It!
These three method calls handle:
- • Service registration (Authentication, Authorization, Entity Framework, OpenIddict)
- • Database creation and migrations
- • Complete middleware pipeline configuration
Step 5: Run Your OIDC Server
dotnet run🎉 Success!
Your OIDC server is now running with:
- Default admin credentials: admin@IdentitySuite.local / P@ssw0rd1234!
- OIDC endpoints: /.well-known/openid-configuration
- Admin interface: Available at your base URL
⚠️ Security: Change default credentials immediately in production!
3. Configuring SPA Clients for OIDC Authentication
"Connect Your Angular, React & Blazor Apps in Minutes"
Now that your IdentitySuite OIDC server is running, let's configure your SPA clients to authenticate with it. We'll cover the essential setup for each popular framework with minimal, production-ready code.
📁 Complete Example Repository
All the code examples below are available in our complete demo repository featuring:
- One IdentitySuite server project
- Three client projects (Blazor WASM, Angular, React)
- Production-ready configurations
- Best practices implementation
3.1 Blazor WebAssembly Configuration
Install the Authentication Package
dotnet add package Microsoft.AspNetCore.Components.WebAssembly.AuthenticationConfigure Program.cs
using Microsoft.AspNetCore.Components.Web;
using Microsoft.AspNetCore.Components.WebAssembly.Hosting;

var builder = WebAssemblyHostBuilder.CreateDefault(args);
builder.RootComponents.Add<App>("#app");
builder.RootComponents.Add<HeadOutlet>("head::after");

builder.Services.AddScoped(sp => new HttpClient { BaseAddress = new Uri(builder.HostEnvironment.BaseAddress) });

builder.Services.AddOidcAuthentication(options =>
{
    builder.Configuration.Bind("Oidc", options.ProviderOptions);
    options.ProviderOptions.ResponseType = "code";
});

await builder.Build().RunAsync();
Add wwwroot\appsettings.json
{
  "Oidc": {
    "Authority": "https://localhost:5000/", //your IdentitySuite address
    "ClientId": "blazor",
    "RedirectUri": "https://localhost:5010/authentication/login-callback",  //adjust the port with the number of your Blazor Wasm
    "PostLogoutRedirectUri": "https://localhost:5010/authentication/logout-callback", //adjust the port with the number of your Blazor Wasm
    "ResponseType": "code",
    "DefaultScopes": [ "openid", "profile", "email" ]
  }
}
Add Authentication to App.razor
<CascadingAuthenticationState>
    <Router AppAssembly="@typeof(App).Assembly">
        <Found Context="routeData">
            <RouteView RouteData="@routeData" DefaultLayout="@typeof(MainLayout)" />
            <FocusOnNavigate RouteData="@routeData" Selector="h1" />
        </Found>
        <NotFound>
            <PageTitle>Not found</PageTitle>
            <LayoutView Layout="@typeof(MainLayout)">
                <p role="alert">Sorry, there's nothing at this address.</p>
            </LayoutView>
        </NotFound>
    </Router>
</CascadingAuthenticationState>
3.2 Angular Configuration
Install OIDC Client Library
npm install angular-oauth2-oidcAdd environment.ts
export const environment = {
  production: false,
  oauthConfig: {
    issuer: 'https://localhost:5000/', //your IdentitySuite address
    clientId: 'angular',
    redirectUri: window.location.origin,
    responseType: 'code',
    scope: 'openid profile email',
    showDebugInformation: true
  }
};
Configure app.module.ts
import { ApplicationConfig, importProvidersFrom, provideZoneChangeDetection, provideBrowserGlobalErrorListeners } from '@angular/core';
import { provideRouter } from '@angular/router';
import { HttpClientModule } from '@angular/common/http';
import { OAuthModule } from 'angular-oauth2-oidc';

import { routes } from './app.routes';

export const appConfig: ApplicationConfig = {
  providers: [
    provideRouter(routes),
    provideZoneChangeDetection({ eventCoalescing: true }),
    provideBrowserGlobalErrorListeners(),
    importProvidersFrom(HttpClientModule),
    importProvidersFrom(OAuthModule.forRoot())
  ]
};
Setup Authentication Service
import { Injectable } from '@angular/core';
import { OAuthService, AuthConfig } from 'angular-oauth2-oidc';
import { environment } from '../environments/environment';

@Injectable({ providedIn: 'root' })
export class AuthService {
  constructor(private oauthService: OAuthService) {
    this.configure();
  }
  private configure() {
    this.oauthService.configure(environment.oauthConfig as AuthConfig);
    this.oauthService.loadDiscoveryDocumentAndTryLogin();
  }
  login() {
    this.oauthService.initLoginFlow();
  }
  logout() {
    this.oauthService.logOut();
  }
  isAuthenticated(): boolean {
    return this.oauthService.hasValidAccessToken();
  }
  getIdTokenClaims(): Record<string, any> | null {
    const claims = this.oauthService.getIdentityClaims();
    return claims ? claims as Record<string, any> : null;
  }
  get accessToken(): string {
    return this.oauthService.getAccessToken();
  }
}
3.3 React Configuration
Install OIDC Client Library
npm install oidc-client-ts react-oidc-contextAdd .env
REACT_APP_OIDC_AUTHORITY=https://localhost:5000/ # your IdentitySuite address
REACT_APP_OIDC_CLIENT_ID=react
REACT_APP_OIDC_REDIRECT_URI=http://localhost:3000/ # adjust the port with the number of your React app
REACT_APP_OIDC_POST_LOGOUT_REDIRECT_URI=http://localhost:3000/ # adjust the port with the number of your React app
REACT_APP_OIDC_SCOPE=openid profile email
Configure PrivateRoute.tsx
import { Navigate, useLocation } from 'react-router-dom';
import { useAuth } from 'react-oidc-context';
import type { ReactElement } from 'react';
interface Props {
    children: ReactElement;
}

export function PrivateRoute({ children }: Props) {
    const auth = useAuth();
    const location = useLocation();

    if (auth.isLoading) {
        return <div>Loading...</div>;
    }
    if (!auth.isAuthenticated) {
        auth.signinRedirect({ state: { from: location } });
        return <div>Redirecting to login…</div>;
    }
    return children;
}
3.4 Register Your SPA Clients in IdentitySuite
⚙️ Client Registration Required
Before your SPAs can authenticate, you need to register them as clients in your IdentitySuite server. This can be done through:
- • The IdentitySuite admin interface
- • Configuration files
- • Programmatic registration during startup
Steps to register a new client in IdentitySuite
- Open the Applications/Resources menu and select Applications .
- Click Add and choose Single Page Application .
- Enter a Client ID and a Display Name .
- In the Application URLs tab, add Redirect URIs and Post Logout Redirect URIs .
- In the Allowed Scopes tab, enable the required scopes and click Save .
Each client registration should specify:
- Client ID: Unique identifier (e.g., "blazor-wasm-client")
- Allowed Grant Types: Authorization Code
- Require PKCE: Enabled
- Redirect URIs: Your SPA's callback URLs
- Allowed Scopes: openid, profile, and any custom scopes
4. Security Best Practices & Common Pitfalls
🔐 Essential Security Checklist
❌ Never Do This:
- • Store client secrets in SPA code (they're public!)
- • Use the Implicit Flow (deprecated and insecure)
- • Store tokens in localStorage without encryption
- • Ignore token expiration handling
- • Use HTTP in production (always HTTPS)
✅ Always Do This:
- • Use Authorization Code + PKCE flow exclusively
- • Implement automatic token refresh
- • Validate redirect URIs strictly
- • Use secure, httpOnly cookies when possible
- • Implement proper logout (including server-side)
- • Monitor for suspicious authentication patterns
🚀 Performance & User Experience Tips
- Silent Token Renewal: Configure automatic token refresh to avoid interrupting user sessions
- Loading States: Always show appropriate loading indicators during authentication flows
- Error Handling: Provide clear, user-friendly error messages for authentication failures
- Deep Linking: Preserve the user's intended destination through the login flow
Conclusion
Congratulations! You've successfully set up a production-ready OIDC server with IdentitySuite and learned how to secure your SPA applications using industry-standard OAuth 2.0 + PKCE flows.
What You've Accomplished:
- 🏗️ Deployed a secure OIDC server in under 5 minutes with IdentitySuite
- 🔐 Implemented PKCE authentication for bulletproof SPA security
- ⚛️ Configured three major SPA frameworks (Blazor, Angular, React)
- 🛡️ Applied security best practices to avoid common vulnerabilities
Next Steps
- Explore the complete example: Check out our GitHub repository with full working implementations
- Advanced configuration: Visit the IdentitySuite documentation for enterprise features
Ready to try it yourself? Explore the pricing plans, or get in touch with our team.
Frequently Asked Questions
Can I use IdentitySuite with existing ASP.NET Core projects?
Absolutely! IdentitySuite integrates seamlessly with existing ASP.NET Core applications. You can add it to your current project without disrupting existing functionality.
Which databases are supported?
IdentitySuite supports SQL Server, PostgreSQL, and MySQL through dedicated Entity Framework Core providers. Choose the one that best fits your infrastructure needs.
Do I need to understand OAuth 2.0 deeply to use IdentitySuite?
Not at all! IdentitySuite abstracts the complexity while following OAuth 2.1 and OpenID Connect best practices automatically. You get enterprise-grade security without the learning curve.
Can I customize the authentication UI?
Yes, IdentitySuite provides a fully customizable Blazor-based interface. You can modify themes, layouts, and workflows to match your brand requirements.
Is PKCE really necessary for all SPAs?
Yes! PKCE is required by OAuth 2.1 for public clients (including SPAs) and is considered a security best practice. It protects against authorization code interception attacks without requiring client secrets.

About IdentitySuite
IdentitySuite simplifies enterprise authentication for .NET developers. Built on proven technologies like ASP.NET Core Identity and Openiddict, we eliminate the complexity of OAuth 2.0 and OpenID Connect implementation while maintaining enterprise-grade security standards.