
IdentitySuite: How to Build Your Own Identity Server
TL;DR - Quick Guide Overview
This comprehensive guide takes you from zero to a production-ready OpenID Connect authentication server in under an hour. You'll deploy IdentitySuite—a self-hosted authentication solution built on Openiddict and ASP.NET Core Identity—configure your database, and register your first client application. No prior OAuth/OIDC expertise required.
Reading Time: ~35-40 minutes
Implementation Time: ~45-60 minutes (including database setup)
What You'll Accomplish:
Prerequisites:
Table of Contents:
What it is, who needs it, and what you can secure with it
Openiddict, ASP.NET Core Identity, standards compliance, and security
Step-by-step installation, database setup, and first login
Configure a SPA client with Authorization Code + PKCE
Summary, resources, and implementing client integration
Comprehensive guide to IdentitySuite: a production-ready, self-hosted OpenID Connect/OAuth 2.0 server built on Openiddict and ASP.NET Core Identity
1.1 What is IdentitySuite?
IdentitySuite is a production-ready OpenID Connect (OIDC) and OAuth 2.0 authentication server that you can deploy, control, and customize according to your specific requirements. Built on battle-tested technologies like Openiddict and ASP.NET Core Identity, it provides enterprise-grade security while remaining accessible to developers of all experience levels.
Unlike cloud-based authentication services where your identity infrastructure lives on someone else's servers, IdentitySuite gives you complete ownership. You deploy it on your infrastructure—whether that's on-premises servers, cloud virtual machines, or containerized environments—and it becomes your central authentication authority for all your applications.
What makes IdentitySuite unique is its approach to complexity. Authentication and authorization using modern standards like OpenID Connect can be intimidating, involving intricate token flows, certificate management, security considerations, and compliance requirements. IdentitySuite abstracts this complexity without hiding it. You get a working authentication server out of the box, with sensible defaults and automatic configuration, but you retain full control to customize every aspect when needed.
The server is built entirely on .NET 10 and leverages the latest features of ASP.NET Core Identity, including native support for passkeys and modern passwordless authentication methods. This foundation ensures that your identity infrastructure stays current with evolving security standards and user expectations.
Key Concept
IdentitySuite is the server that issues and validates authentication tokens. Your applications—whether they're built with Angular, React, Vue, Blazor, iOS, Android, or any other technology—act as clients that trust IdentitySuite to handle authentication. This separation of concerns is at the heart of modern security architecture.
1.2 The Problem It Solves
Building secure authentication from scratch is a significant undertaking that many development teams underestimate. Let's explore the challenges that IdentitySuite addresses.
Implementation Complexity
OpenID Connect and OAuth 2.0 are powerful standards, but implementing them correctly requires deep expertise. You need to understand token flows, handle security vulnerabilities, implement token refresh mechanisms, manage CORS policies, and ensure compliance with specifications. A single misconfiguration can create security holes that expose your entire application ecosystem.
IdentitySuite eliminates months of research and development by providing a standards-compliant implementation that's been tested and validated. You don't need to become an OAuth expert to deploy secure authentication—you just need to install IdentitySuite and configure it for your needs.
Security and Compliance
Modern authentication involves numerous security considerations. Token encryption, secure storage, certificate rotation, protection against common attacks (CSRF, XSS, token theft), and compliance with regulations like GDPR all require careful implementation.
IdentitySuite handles these concerns through well-architected defaults and best practices. Certificates can be auto-generated for development or you can provide your own for production. Tokens are encrypted by default. Security headers are configured correctly. Passkey support enables phishing-resistant authentication. You get enterprise-grade security built on proven foundations.
Maintenance Overhead
Authentication isn't a "set it and forget it" feature. Security standards evolve, vulnerabilities are discovered, and best practices change. Maintaining a custom authentication solution means staying current with these changes, which requires dedicated resources and ongoing attention.
With IdentitySuite, maintenance is simplified. Updates bring new features, security patches, and compliance improvements. The underlying technologies—Openiddict and ASP.NET Core Identity—are actively maintained by their respective communities, and IdentitySuite integrates these updates seamlessly.
1.3 Who Should Use IdentitySuite?
IdentitySuite serves a wide range of use cases and organizational needs. Here's who benefits most from this solution.
Enterprise Development Teams
Large organizations with multiple applications need centralized authentication that works across their entire application portfolio. IdentitySuite serves as a single source of truth for identity, enabling Single Sign-On (SSO) across web applications, mobile apps, and APIs. IT departments gain control over security policies, user management, and compliance requirements while development teams get a reliable authentication API.
Enterprise teams also appreciate the flexibility to deploy on-premises or in their chosen cloud environment, maintaining control over sensitive identity data and ensuring compliance with data residency requirements.
SaaS Companies
Software-as-a-Service providers need robust authentication that scales with their business. Whether you're building B2B or B2C applications, IdentitySuite provides the foundation for secure user authentication, role-based access control, and user management across your application portfolio.
As a centralized authentication server, IdentitySuite enables you to implement sophisticated access control patterns and provide your users with modern authentication experiences including passwordless options through passkeys. Your applications can trust the same authentication authority, simplifying your security architecture.
Development Agencies
Agencies building applications for clients face a recurring challenge: every project needs authentication, but client requirements vary. Some need basic username/password authentication, others require social login, enterprise SSO, or multi-factor authentication.
IdentitySuite provides a consistent foundation that you can deploy for each client. While core authentication features like social login are configured at the server level and apply to all registered client applications, you can customize the user interface appearance (such as colors and branding) to match each client's identity. This reduces project risk, improves delivery timelines, and ensures consistent security standards across your client portfolio.
Startups Building Scalable Infrastructure
Early-stage companies need to move fast, but they also need to build on solid foundations. Starting with a homegrown authentication system might seem quick initially, but it creates technical debt that becomes painful as you scale.
IdentitySuite lets startups build on enterprise-grade authentication from day one without the complexity or cost typically associated with such solutions. As your user base grows, your authentication infrastructure grows with it—no rewrites required.
Teams Migrating from Deprecated Solutions
If you're currently using IdentityServer (which has changed its licensing model and architectural direction) or other authentication solutions that no longer meet your needs, IdentitySuite provides a clear migration path. Built on Openiddict—one of the recommended alternatives to IdentityServer—it offers similar capabilities with a more straightforward licensing model and active development.
Universal Applicability
Whether you're building a small internal tool or a large-scale SaaS platform, IdentitySuite scales to your needs. The same server that powers a startup's MVP can grow to handle millions of authentications for an enterprise application.
1.4 What Can You Secure with IdentitySuite?
One of IdentitySuite's greatest strengths is its platform-agnostic nature. Because it implements standard OpenID Connect and OAuth 2.0 protocols, it can authenticate users for virtually any type of application. Here's a comprehensive look at what you can secure.
Single Page Applications (SPAs)
Modern web applications built with JavaScript frameworks are IdentitySuite's most common use case. Whether you're using Angular, React, Vue, Svelte, or Blazor WebAssembly, IdentitySuite provides secure authentication using the Authorization Code flow with PKCE (Proof Key for Code Exchange).
SPAs are particularly challenging to secure because all client-side code is visible to users. IdentitySuite's implementation follows best practices recommended by the OAuth 2.1 specification, ensuring your SPA authentication is protected against common attacks like authorization code interception.
Learn More
For a detailed guide on securing SPAs with IdentitySuite, including step-by-step configuration for Angular, React, and Blazor WebAssembly, check out our article Authentication Made Easy with IdentitySuite .
Server-Side Web Applications
Traditional server-rendered web applications—whether built with ASP.NET MVC, Node.js with Express, PHP, Ruby on Rails, or Python Django—can use IdentitySuite for authentication. These applications typically use the Authorization Code flow (without PKCE, since the client secret can be kept secure on the server).
Server-side applications benefit from simpler token management since tokens can be stored securely on the server rather than in the browser. IdentitySuite integrates seamlessly with standard OIDC middleware available in most server-side frameworks.
Mobile Applications
Native mobile apps for iOS, Android, React Native, Flutter, and .NET MAUI can all authenticate through IdentitySuite. Mobile authentication uses the Authorization Code flow with PKCE, similar to SPAs, but with platform-specific considerations for handling browser redirects and deep linking.
Mobile apps typically use the system browser for authentication (rather than embedded web views) to ensure users see the authentic IdentitySuite login interface and can benefit from any existing sessions. IdentitySuite's implementation supports these native authentication flows out of the box.
Desktop Applications
Desktop applications built with Electron, WPF, WinForms, or cross-platform frameworks can integrate with IdentitySuite. Like mobile apps, desktop applications need to handle browser-based authentication flows, but IdentitySuite provides the flexibility to support these scenarios.
Desktop apps can also use custom URI schemes or local HTTP listeners to receive authentication callbacks, and IdentitySuite's redirect URI validation can be configured to support these patterns.
APIs and Microservices
Protecting APIs is where IdentitySuite truly shines. Your APIs can validate access tokens issued by IdentitySuite, ensuring that only authenticated requests with appropriate scopes can access protected resources.
For service-to-service authentication (where one API needs to call another), IdentitySuite supports the Client Credentials flow. This allows your backend services to authenticate with each other securely without user involvement.
Microservices architectures benefit especially from centralized authentication. Instead of each microservice implementing its own authentication logic, they all trust tokens from IdentitySuite. This creates a consistent security boundary across your entire distributed system.
IoT Devices and Custom Clients
Any device or application that can make HTTP requests and handle OAuth 2.0 flows can authenticate through IdentitySuite. This includes IoT devices, custom hardware, command-line tools, and specialized applications.
The flexibility of the OAuth 2.0 specification means you can implement authentication patterns that fit your specific use case while still benefiting from IdentitySuite's security guarantees.
| Application Type | Recommended Flow | Token Storage |
|---|---|---|
| Single Page Application | Authorization Code + PKCE | Memory / sessionStorage |
| Server-Side Web App | Authorization Code | Server session |
| Mobile Application | Authorization Code + PKCE | Secure storage (Keychain/Keystore) |
| API / Microservice | Token validation | N/A (validates incoming tokens) |
| Service-to-Service | Client Credentials | Memory (short-lived) |
1.5 Key Benefits at a Glance
Let's summarize the core advantages that make IdentitySuite a compelling choice for your authentication infrastructure.
Standards Compliance
IdentitySuite implements current OAuth and OpenID Connect specifications, including OAuth 2.0, OAuth 2.1, OpenID Connect 1.0, and PKCE. This standards compliance means your authentication infrastructure works with any compliant client library, regardless of programming language or platform.
Production-Ready Out of the Box
Unlike frameworks that require extensive configuration before they're deployment-ready, IdentitySuite comes with sensible defaults that work for production environments. Certificate management is automatic, security settings are configured correctly, and the admin interface is fully functional. You can go from installation to production deployment in hours, not weeks.
Flexible Deployment Options
Deploy IdentitySuite wherever you need it. On-premises Windows or Linux servers, Azure, AWS, Google Cloud, Docker containers, Kubernetes clusters—IdentitySuite adapts to your infrastructure. This flexibility means you can meet data residency requirements, comply with security policies, and optimize for your specific operational needs.
Built-In Administration Interface
The included Blazor Server admin interface provides complete management capabilities without requiring custom development. Manage users, configure applications, define scopes and permissions, and handle certificates—all through an intuitive web interface. No command-line expertise or database manipulation required for day-to-day operations.
Automatic Certificate Management
One of the most complex aspects of running an authentication server is managing signing and encryption certificates. IdentitySuite can automatically generate and manage certificates in development and testing environments, handling generation, rotation before expiration, and maintaining expired certificates during a grace period so existing tokens remain valid. For production deployments, you can provide your own certificates from trusted certificate authorities, which you'll manage according to your organization's security policies.
Multiple Database Support
Choose the database that fits your infrastructure: Microsoft SQL Server, PostgreSQL, or MySQL/MariaDB. All are fully supported with identical features. This flexibility means you're not locked into a specific database vendor and can leverage existing database infrastructure and expertise.
Modern Authentication Features
Built on .NET 10 and the latest ASP.NET Core Identity, IdentitySuite includes support for cutting-edge authentication methods including passkeys (WebAuthn), providing phishing-resistant authentication that's both more secure and more user-friendly than traditional passwords.
Comprehensive Documentation and Support
IdentitySuite includes detailed documentation covering installation, configuration, common scenarios, and troubleshooting. Example implementations for various client types help you get started quickly, and support options ensure you're never blocked by technical challenges.
Extensibility and Customization
IdentitySuite works great out of the box, but its real strength emerges when you start shaping it around your product’s identity. The Admin UI includes a dedicated Branding & Appearance section that allows you to control the look and feel of every identity‑related page—login, registration, password reset, account management, and more. You can define your color palette, typography, spacing rules, and logo assets, ensuring that the entire authentication experience feels like a seamless extension of your application rather than a bolted‑on module. These settings are applied consistently across all IdentitySuite components, giving you a unified, professional, and brand‑aligned UX without writing a single line of CSS.
IdentitySuite also includes a powerful Email Template Designer, inspired by modern drag‑and‑drop editors like Stripo. This tool lets you craft fully customized HTML templates for all system‑generated emails—registration confirmation, password reset, email change verification, and any additional workflow you enable. You can insert your logos, define layout blocks, adjust colors and fonts, and embed dynamic placeholders for user‑specific data. The result is a set of polished, responsive email templates that reflect your brand and elevate the onboarding and security flows.
Beyond visual customization, IdentitySuite gives you full control over authentication behavior. You can configure flows and policies, enrich tokens with business‑specific claims, and leverage OpenIddict’s extensibility to introduce custom endpoints or advanced scenarios. The underlying OpenIddict and ASP.NET Core Identity frameworks provide well‑documented extension points, ensuring that even the most specialized requirements can be addressed cleanly and maintainably.
Why This Matters
The combination of these benefits means IdentitySuite eliminates the usual trade-offs in authentication solutions. You don't have to choose between ease of use and flexibility, between quick deployment and enterprise features, or between standards compliance and practical functionality.
You get a solution that serves startups and enterprises equally well, that works for simple scenarios and complex requirements, and that reduces your time to market while providing a solid foundation for long-term growth.
Now that you understand what IdentitySuite is, the problems it solves, who should use it, and its key benefits, you're ready to dive deeper into its technical architecture and learn how to deploy it for your applications. In the next sections, we'll explore the technologies that power IdentitySuite and walk through a detailed installation and configuration process.
2. Architecture & Foundations
Understanding the architectural foundation of IdentitySuite helps you appreciate why it's both powerful and reliable. Rather than building an authentication server from scratch, IdentitySuite is built on top of mature, well-tested open-source technologies that have been proven in production environments worldwide. This approach gives you enterprise-grade capabilities without the complexity of starting from zero.
2.1 Built on Proven Technologies
IdentitySuite's strength comes from the careful integration of three core technologies, each chosen for its reliability, security, and community support. Let's explore each component and understand its role.
Openiddict: The OpenID Connect Foundation
At the heart of IdentitySuite's authentication capabilities is Openiddict, a certified OpenID Connect server implementation for .NET. Openiddict handles all the complex protocol work—token generation, endpoint management, flow orchestration, and standards compliance.
Openiddict is not a framework you learn; it's infrastructure that works behind the scenes. It implements the intricate details of the OAuth 2.0 and OpenID Connect specifications so you don't have to. When a client application requests an access token, Openiddict validates the request, checks permissions, generates the appropriate tokens, and ensures everything complies with the relevant standards.
Why Openiddict?
- Certified Implementation: Openiddict is officially certified by the OpenID Foundation, meaning it has passed rigorous conformance tests for OpenID Connect compatibility.
- Active Development: The project is actively maintained with regular updates, security patches, and new features that keep pace with evolving standards.
- Flexibility: Openiddict provides extensive configuration options and extensibility points, allowing IdentitySuite to adapt to diverse requirements.
- Community Support: A large community of developers use Openiddict in production, contributing to its stability and providing resources for troubleshooting.
For IdentitySuite users, Openiddict's presence means you benefit from years of protocol implementation expertise without needing to become an OAuth expert yourself. The authentication flows just work, and they work correctly according to the specifications.
ASP.NET Core Identity: User Management Foundation
Managing users—their credentials, profiles, roles, and authentication states—is handled by ASP.NET Core Identity , Microsoft's comprehensive identity management system. This is the same technology that powers authentication in countless ASP.NET applications, and it brings decades of security best practices to IdentitySuite.
ASP.NET Core Identity handles password hashing using industry-standard algorithms (PBKDF2 by default), manages user lockouts after failed login attempts, supports two-factor authentication, handles password reset flows, and maintains user sessions. It also provides the infrastructure for role-based and claims-based authorization, allowing you to implement sophisticated access control patterns.
With .NET 10, ASP.NET Core Identity has evolved to include native support for passkeys (WebAuthn/FIDO2), representing the future of authentication. Passkeys eliminate passwords entirely, using cryptographic keys stored securely on users' devices. They're resistant to phishing, don't require users to remember complex passwords, and provide a better user experience across desktop and mobile devices.
Passkeys: The Future of Authentication
IdentitySuite's support for passkeys means you can offer users a modern, secure authentication option that works seamlessly across devices. Users register their device (phone, laptop, security key) once, and subsequent logins require just a fingerprint, face scan, or PIN—no passwords to remember or type.
The integration with ASP.NET Core Identity also means IdentitySuite benefits from Microsoft's ongoing security investments. As new threats emerge and best practices evolve, updates to ASP.NET Core Identity flow through to IdentitySuite, keeping your authentication infrastructure current.
Blazor Server: Modern Administration Interface
Managing an authentication server requires administrative capabilities—creating users, registering client applications, configuring scopes and permissions, and managing system settings. IdentitySuite provides these capabilities through a Blazor Server interface.
Blazor Server is a web application framework that renders UI on the server and updates the browser in real-time using SignalR connections. This architecture provides several advantages for an admin interface:
- Security by Default: Since the application logic runs on the server, there's no client-side code to examine or manipulate. This is particularly important for administrative functionality where security is paramount.
- Real-time Updates: Changes made by administrators are reflected immediately across all connected sessions without requiring page refreshes.
- Rich Interactions: Blazor provides a modern, reactive user experience similar to single-page applications, but without the complexity of managing client-side state.
- Integrated Authentication: The admin interface uses the same ASP.NET Core Identity infrastructure as the rest of IdentitySuite, ensuring consistent security policies.
For administrators, this means a responsive, intuitive interface for managing all aspects of the authentication server without needing to manipulate configuration files or run command-line tools for routine tasks.
2.2 Standards Compliance
IdentitySuite's adherence to international standards is fundamental to its interoperability and security. When we say it's "standards-compliant," here's specifically what that means.
OAuth 2.0 and OAuth 2.1
OAuth 2.0 is the industry-standard protocol for authorization. It defines how applications can obtain limited access to user resources without exposing user credentials. IdentitySuite implements all the essential OAuth 2.0 flows:
- Authorization Code Flow: The most secure flow, used by server-side web applications that can securely store client secrets.
- Authorization Code Flow with PKCE: Essential for single-page applications and mobile apps where client secrets cannot be securely stored.
- Client Credentials Flow: Used for service-to-service authentication where no user is involved.
- Refresh Token Flow: Allows applications to obtain new access tokens without requiring users to re-authenticate.
OAuth 2.1 is the next evolution of the OAuth specification, consolidating best practices and security improvements discovered since OAuth 2.0's initial release. Key OAuth 2.1 improvements that IdentitySuite supports include:
- Mandatory PKCE: All authorization code flows must use PKCE, not just public clients.
- Deprecation of Implicit Flow: The less secure implicit flow is no longer recommended and should not be used for new applications.
- Exact Redirect URI Matching: Stricter validation of redirect URIs to prevent certain types of attacks.
- Refresh Token Rotation: Enhanced security through automatic refresh token rotation.
OpenID Connect 1.0
While OAuth 2.0 handles authorization (granting access to resources), OpenID Connect adds an authentication layer on top. It allows applications to verify the identity of users and obtain basic profile information.
OpenID Connect introduces the concept of ID tokens—JSON Web Tokens (JWTs) that contain verified information about the authenticated user. These tokens are signed by IdentitySuite and can be validated by any client application to confirm a user's identity without additional network calls.
IdentitySuite implements all required OpenID Connect features including:
- Discovery: The
/.well-known/openid-configurationendpoint provides all the information client applications need to configure themselves automatically. - UserInfo Endpoint: Allows applications to retrieve additional user profile information after authentication.
- Standard Claims: Support for standard profile claims like name, email, profile picture, and more.
- Multiple Response Types: Support for different response type combinations based on application needs.
PKCE (Proof Key for Code Exchange)
PKCE deserves special attention because it's critical for securing modern applications, especially single-page applications and mobile apps. Before PKCE, public clients (applications that can't securely store secrets) were vulnerable to authorization code interception attacks.
PKCE works by having the client generate a random value (code verifier) at the start of the authentication flow, then sending a hash of that value (code challenge) to the authorization server. When exchanging the authorization code for tokens, the client must provide the original code verifier. This ensures that even if an attacker intercepts the authorization code, they cannot exchange it for tokens without the code verifier.
IdentitySuite enforces PKCE for all public clients and supports it for confidential clients, aligning with OAuth 2.1 recommendations.
Security Best Practice
All modern single-page applications and mobile apps should use the Authorization Code flow with PKCE. The older Implicit flow, while still supported by many servers, has known security vulnerabilities and is deprecated in OAuth 2.1. IdentitySuite follows these modern best practices by default.
Token Standards
IdentitySuite uses JSON Web Tokens (JWT) for both access tokens and ID tokens. JWTs are self-contained, meaning they include all the information needed to validate them without requiring database lookups. This makes them efficient for high-volume scenarios and enables stateless authentication in distributed systems.
IdentitySuite also supports:
- Token Introspection: Allows resource servers to validate tokens by querying the IdentitySuite server directly.
- Token Revocation: Enables revoking access tokens and refresh tokens before they expire.
- Token Encryption: Optional encryption of tokens for additional security in sensitive scenarios.
2.3 Database Support
IdentitySuite needs to store user accounts, client applications, tokens, and configuration data. This requires a reliable database, and IdentitySuite supports three major database systems, each with different strengths.
Microsoft SQL Server
SQL Server is Microsoft's flagship relational database system. It's the natural choice for Windows-based deployments and integrates seamlessly with the Microsoft ecosystem.
When to choose SQL Server:
- You're deploying on Windows servers or already have SQL Server infrastructure
- Your organization has SQL Server licensing and expertise
- You need integration with other Microsoft data tools and services
- You're using Azure and can leverage Azure SQL Database for managed hosting
SQL Server runs on both Windows and Linux, offering flexibility in deployment platforms. For development, SQL Server Express and LocalDB provide free options with no licensing costs. For production, SQL Server offers enterprise features like high availability, advanced security, and comprehensive monitoring.
PostgreSQL
PostgreSQL is a powerful, open-source relational database known for its standards compliance, extensibility, and cross-platform support. It's become increasingly popular for cloud-native applications.
When to choose PostgreSQL:
- You prefer open-source solutions without licensing costs
- You're deploying on Linux or need true cross-platform compatibility
- You want to use managed PostgreSQL services (AWS RDS, Azure Database, Google Cloud SQL)
- Your organization has PostgreSQL expertise or prefers its feature set
PostgreSQL's strong support for JSON data types, full-text search, and advanced querying makes it an excellent foundation for IdentitySuite. The active PostgreSQL community and ecosystem of tools provide robust support for production deployments.
MySQL / MariaDB
MySQL and MariaDB (a MySQL fork) are widely-deployed open-source databases. Many organizations already have MySQL infrastructure, making it a convenient choice for IdentitySuite deployment.
When to choose MySQL/MariaDB:
- You have existing MySQL/MariaDB infrastructure and expertise
- You're using hosting providers that specialize in MySQL
- You need compatibility with MySQL-based tooling and workflows
- You want to use managed MySQL services from cloud providers
⚠️ MySQL Configuration Requirement
When using MySQL or MariaDB with IdentitySuite, you must include
AllowUserVariables=true in your
connection string. This setting is required by the Pomelo MySQL provider's query caching system.
Without it, certain database operations will fail. Example connection string:
Entity Framework Core: The Database Abstraction Layer
IdentitySuite uses Entity Framework Core (EF Core) as its data access layer. EF Core is Microsoft's modern object-relational mapper (ORM) that provides a consistent programming interface regardless of which database you choose.
This abstraction means you can switch databases without changing IdentitySuite's code. All you need to do is install the appropriate database provider package and update your connection string. The application code remains the same.
EF Core also handles database migrations—the process of creating and updating database schema as IdentitySuite evolves. When you upgrade to a new version of IdentitySuite that requires database changes, EF Core migrations automatically update your schema while preserving your existing data.
| Database | Best For | License | Platforms |
|---|---|---|---|
| SQL Server | Windows environments, Microsoft stack, Azure deployments | Commercial (Express free) | Windows, Linux |
| PostgreSQL | Cross-platform, cloud-native, open-source preference | Open Source (PostgreSQL License) | Windows, Linux, macOS |
| MySQL/MariaDB | Existing MySQL infrastructure, wide hosting support | Open Source (GPL/MariaDB) | Windows, Linux, macOS |
2.4 Security by Design
Security isn't an afterthought in IdentitySuite—it's fundamental to the architecture. Let's examine the key security features that protect your authentication infrastructure.
Certificate Management
IdentitySuite uses cryptographic certificates for two critical purposes: signing tokens and encrypting sensitive data. These certificates ensure that tokens issued by IdentitySuite can be trusted and that sensitive information remains confidential.
Signing Certificates:
IdentitySuite signs every access token and ID token using a private key. Client applications and resource servers validate these tokens using the corresponding public key published at the JWKS endpoint. The signature guarantees that the token was issued by IdentitySuite and that its contents have not been altered.
Encryption Certificates:
For scenarios requiring confidentiality, IdentitySuite can also encrypt tokens before delivering them to the client. An encrypted token can be read only by the intended recipient, who holds the matching decryption key. Encryption prevents unauthorized parties from inspecting the token’s payload, while the signature continues to ensure authenticity and integrity.
Certificate Modes:
IdentitySuite supports two certificate modes to accommodate different deployment scenarios:
- Auto-Generated Certificates (Development/Testing): IdentitySuite can automatically generate self‑signed certificates the first time it starts. This is ideal for development and testing environments where you need to get up and running quickly. The system creates both signing and encryption certificates, stores them securely, and manages their lifecycle without requiring any manual setup. However, self‑signed certificates are not suitable for production deployments. While clients can technically validate tokens signed with these keys, production systems require stable, long‑lived, and externally managed certificates to ensure proper key rotation, auditing, and operational trust.
- Custom Certificates (Production): For production environments, you provide your own certificates issued by a trusted certificate authority. These certificates integrate with your organization’s PKI (Public Key Infrastructure) and follow your established security policies for storage, renewal, and rotation. IdentitySuite uses these certificates to sign and encrypt tokens, ensuring a stable and auditable key lifecycle. Clients don’t rely on the certificate chain itself; instead, they validate tokens using the public keys exposed through the JWKS endpoint. IdentitySuite supports loading certificates from files or from the operating system’s certificate store.
Certificate Rotation and Grace Periods:
When using auto-generated certificates, IdentitySuite includes a certificate rotation mechanism. When a certificate approaches expiration, IdentitySuite can generate a new certificate while keeping the old one active for a grace period. During this grace period, tokens signed with the old certificate remain valid, preventing service disruption while clients update their cached public keys.
For custom certificates, you control the rotation process. IdentitySuite maintains a manifest of expired certificates and their grace periods, ensuring smooth transitions between certificates without invalidating existing tokens prematurely.
Token Encryption and Protection
IdentitySuite provides multiple layers of token protection to ensure that sensitive authentication data remains secure throughout its lifecycle.
Access Token Encryption:
By default, IdentitySuite can encrypt access tokens, preventing their contents from being read by anyone who intercepts them. This is particularly important when access tokens contain sensitive claims or when they're transmitted through potentially insecure channels. Only the intended resource server, which has the decryption key, can read the token's contents.
Refresh Token Security:
Refresh tokens are long-lived credentials that allow applications to obtain new access tokens without user interaction. IdentitySuite stores refresh tokens securely in the database with hashing to prevent theft. The tokens support rotation (each refresh generates a new refresh token) and can be revoked if compromised.
Data Protection:
IdentitySuite leverages ASP.NET Core Data Protection for encrypting sensitive data at rest. This includes session data, anti-forgery tokens, and any other sensitive information that needs to persist between requests. The Data Protection system uses key derivation and encryption algorithms that meet modern cryptographic standards.
Defense Against Common Attacks
IdentitySuite implements protections against the most common web application security threats:
- Cross-Site Request Forgery (CSRF): Anti-forgery tokens protect all state-changing operations, preventing attackers from tricking users into performing unwanted actions.
- Cross-Site Scripting (XSS): The Blazor Server architecture and proper output encoding prevent injection of malicious scripts into the application.
- Authorization Code Interception: PKCE prevents attackers from exchanging intercepted authorization codes for tokens.
- Token Theft: Short token lifetimes, refresh token rotation, and encryption minimize the impact of stolen tokens.
- Brute Force Attacks: Account lockout after failed login attempts and rate limiting protect against password guessing attacks.
- Rate Limiting: IdentitySuite includes built-in traffic rate limiting that protects your authentication endpoints from abuse and denial-of-service attacks. You can configure rate limits per endpoint type (authorization, token, userinfo, etc.), implement whitelist/blacklist rules based on IP addresses or client identifiers, and customize thresholds to match your security requirements. This protects against brute force attacks, credential stuffing attempts, and excessive token requests that could overwhelm your server. Rate limiting can be fine-tuned for different scenarios—stricter limits for sensitive endpoints like token generation, more permissive limits for public discovery endpoints.
Secure Password Storage
User passwords are never stored in plain text. ASP.NET Core Identity uses PBKDF2 (Password-Based Key Derivation Function 2) with HMAC-SHA256 by default, applying multiple iterations and random salts to make password cracking computationally expensive. Even if an attacker gains access to the database, they cannot easily recover user passwords.
Protecting Personal Data in the Identity Database
IdentitySuite can also leverage ASP.NET Core Identity’s ProtectPersonalData feature to encrypt sensitive user information stored in the Identity tables. When this option is enabled, fields such as email, phone number, recovery codes, and other personal data are transparently encrypted before being written to the database. Decryption happens automatically when the application needs to read these values. This adds an additional layer of protection for data at rest, ensuring that even if the database were accessed without authorization, sensitive information would remain unreadable.
Passkey Security
The integration with passkeys provides the highest level of authentication security. Passkeys use public-key cryptography where the private key never leaves the user's device. This makes passkey authentication resistant to:
- Phishing: The cryptographic binding to the domain prevents use on fake login pages
- Credential Stuffing: Each credential is unique to the service, so breaches don't affect other sites
- Password Guessing: No passwords to guess—authentication is purely cryptographic
Security Through Architecture
The security of IdentitySuite isn't just about individual features—it's about how these components work together. The combination of Openiddict's protocol compliance, ASP.NET Core Identity's proven security patterns, proper certificate management, and defense-in-depth strategies creates a robust security posture.
By building on established, well-audited frameworks rather than implementing security from scratch, IdentitySuite benefits from the collective security expertise of the .NET and OpenID Connect communities.
Understanding IdentitySuite's architectural foundation—the proven technologies it builds upon, the standards it implements, the databases it supports, and the security principles it embodies—gives you confidence in deploying it as your authentication infrastructure. In the next section, we'll move from theory to practice with a detailed, step-by-step guide to installing and configuring your first IdentitySuite instance.
3. Installation & Initial Setup
Now that you understand what IdentitySuite is and how it's architected, it's time to get hands-on. This section provides a comprehensive, step-by-step guide to installing and configuring your first IdentitySuite instance. We'll cover everything from prerequisites through your first successful login, explaining not just what to do, but why each step matters.
Follow Along
This guide is designed to be followed step-by-step. Even if you're new to .NET or authentication servers, you'll have a working IdentitySuite instance by the end. Take your time with each step, and don't skip the explanation sections—they provide context that will help you troubleshoot and customize later.
3.1 Prerequisites
Before installing IdentitySuite, make sure you have the essential components in place.
.NET 10 SDK
IdentitySuite 2.0 requires .NET 10 (LTS).
Check your version:
dotnet --versionIf it doesn’t start with 10., install the .NET 10 SDK from the official Microsoft download page.
Integrated Development Environment (IDE)
You can use any editor, but the most common choices are:
- Visual Studio 2022 (Windows and macOS) – full-featured, recommended for most developers.
- Visual Studio Code (Windows, macOS, Linux) – lightweight and cross‑platform.
- JetBrains Rider (Windows, macOS, Linux) – commercial, cross‑platform.
IdentitySuite works the same regardless of your IDE.
Database Requirements
IdentitySuite requires a relational database. For development you can use:
- SQL Server LocalDB (Windows only): Automatically installed with Visual Studio, perfect for development. No configuration needed.
- SQL Server Express (Windows/Linux): Free edition of SQL Server, suitable for development and small production deployments.
- PostgreSQL: Install locally using the official installer or via Docker. Works on all platforms.
- MySQL/MariaDB: Install locally or use Docker. Remember the
AllowUserVariables=truerequirement! - Docker containers: Quick way to get any database running without permanent installation
For your first installation, we recommend using LocalDB (if you're on Windows with Visual Studio) or a Docker container with PostgreSQL—both options require minimal setup and let you focus on learning IdentitySuite.
3.2 Creating a New Project
IdentitySuite is built as a Blazor Server application. We'll start by creating a minimal Blazor Server project that serves as the foundation for IdentitySuite.
Step 1: Create the Project Directory
Open a terminal or command prompt and navigate to where you want to create your project. Then execute:
dotnet new blazor -o IdentitySuite.Server --empty --interactivity Server --all-interactiveLet's understand what each part of this command does:
dotnet new blazor: Creates a new project using the Blazor template. Blazor is Microsoft's framework for building interactive web applications with C# instead of JavaScript.-o IdentitySuite.Server: Specifies the output directory name. This creates a folder called "IdentitySuite.Server" and places all project files inside it. You can use any name you prefer.--empty: Creates a minimal project without example pages and components. This gives us a clean slate to work with, as IdentitySuite will provide all the functionality we need.--interactivity Server: Configures the project to use Server-side interactivity. In this mode, UI updates happen on the server and are sent to the browser over a SignalR connection. This is more secure than client-side rendering for administrative interfaces.--all-interactive: Makes all components interactive by default, which is what we want for IdentitySuite's admin interface.
After running this command, navigate into the newly created directory:
cd IdentitySuite.ServerUnderstanding the Project Structure
The command created several files and folders. Here are the important ones:
IdentitySuite.Server.csproj: The project file that defines dependencies, target framework, and build settings.Program.cs: The entry point of your application. This is where we'll configure IdentitySuite.appsettings.json: General application configuration (we'll mostly use IdentitySuite-specific config files instead).Components/: Folder for Blazor components (will be used by IdentitySuite's UI).
3.3 Installing IdentitySuite Packages
Now we'll add IdentitySuite to the project. This involves installing the core package and a database provider package.
Step 2: Install the Core Package
The core IdentitySuite package contains all the authentication functionality, admin interface, and integration with Openiddict and ASP.NET Core Identity:
dotnet add package IdentitySuiteThis command downloads the IdentitySuite package from NuGet (the .NET package repository) and adds it to your project. The command may take a moment as it downloads IdentitySuite and all its dependencies.
Step 3: Choose and Install a Database Provider
IdentitySuite needs to know how to communicate with your chosen database. Install ONE of the following packages based on which database you'll use.
For SQL Server:
dotnet add package IdentitySuite.EntityFrameworkCore.SqlServerUse this if you're on Windows and want to use LocalDB for development, or if you have SQL Server infrastructure available. This is often the easiest choice for Windows developers.
For PostgreSQL:
dotnet add package IdentitySuite.EntityFrameworkCore.PostgreSqlUse this for cross-platform deployments, Linux servers, or if you prefer open-source databases. PostgreSQL works identically on Windows, macOS, and Linux.
For MySQL/MariaDB:
dotnet add package IdentitySuite.EntityFrameworkCore.MySql
Use this if you have existing MySQL or MariaDB infrastructure. Remember that you'll need to include
AllowUserVariables=true in your connection
string (we'll cover this in the configuration step).
Important: Install Only One Database Provider
Don't install multiple database provider packages. Choose the one that matches your database and install only that package. If you need to switch databases later, you can uninstall one provider and install another.
Verifying Package Installation
After installing the packages, you can verify they were added correctly by examining your project file:
dotnet list package
You should see IdentitySuite and your chosen
database provider package in the output.
3.4 Configuring Program.cs
Now we need to configure the application to use IdentitySuite. This is remarkably simple—just three method calls that handle all the complexity behind the scenes.
Step 4: Update Program.cs
Open the Program.cs file in your project and
replace its entire contents with:
using IdentitySuite;

var builder = WebApplication.CreateBuilder(args);

// 1. Registers all required services
builder.AddIdentitySuiteServices();

var app = builder.Build();

// 2. Creates/updates the database
await app.SetupIdentitySuiteDbAsync();

// 3. Enables all runtime services
app.UseIdentitySuiteServices();

await app.RunAsync();
That's it! This minimal Program.cs is all you need. Let's understand what each method does and why this simple configuration is so powerful.
Deep Dive: AddIdentitySuiteServices()
The first method, AddIdentitySuiteServices(),
is called on the builder before the application is built. This method registers all the services that
IdentitySuite needs to function. Behind the scenes, it's performing dozens of registrations that you would
otherwise have to configure manually:
- Blazor Server Services: SignalR for real-time communication, circuit handlers for managing user sessions, component rendering services, and cascade authentication state providers.
- Openiddict Services: The core Openiddict server, token validation services, authorization endpoint handlers, token endpoint handlers, userinfo endpoint handlers, and all the protocol implementation details.
- Authentication & Authorization: Cookie authentication for the admin interface, JWT bearer authentication for API access, authorization policy providers, and claim transformation services.
- Entity Framework Core: Database contexts for IdentitySuite data, Openiddict stores, and ASP.NET Core Identity stores. The correct database provider is automatically configured based on which package you installed.
- ASP.NET Core Identity: User manager, sign-in manager, role manager, password hashers, validators, token providers, and all the user management infrastructure.
- Additional Services: HTTP context accessor, antiforgery services, data protection, and various helper services.
This single method call replaces what would typically be 50-100 lines of configuration code in a standard ASP.NET Core application. IdentitySuite has done the work of figuring out the right configuration, so you don't have to.
Deep Dive: SetupIdentitySuiteDbAsync()
The second method, SetupIdentitySuiteDbAsync(),
handles all database setup. This method must be called after
builder.Build()
but before app.Run()
because it needs access to the fully configured services.
When you run your application for the first time, this method:
- Reads Configuration: Looks at your
IdentitySuiteSettings.{Environment}.jsonfile to determine if database initialization is enabled and what the connection string is. - Checks for Pending Migrations: Entity Framework Core uses migrations to evolve your database schema over time. This method checks if there are any migrations that haven't been applied yet.
- Applies Migrations: If the
Initializesetting is true, it automatically applies pending migrations, creating or updating database tables as needed. - Seeds Initial Data: Creates the default administrator account, initial roles, and any other required seed data. This only happens on first run when the database is empty.
Safe for Production
You might wonder if running migrations automatically on startup is safe for production. The Entity Framework
Core migration system is designed to be safe and idempotent—running migrations multiple times has no effect
after they've been applied once. However, for production deployments with large databases, you might prefer
to apply migrations manually during maintenance windows. You can control this behavior with the
Initialize configuration setting.
Deep Dive: UseIdentitySuiteServices()
The third method, UseIdentitySuiteServices(),
configures the middleware pipeline. Middleware in ASP.NET Core processes incoming HTTP requests and outgoing
responses. The order of middleware is critical—each piece processes the request and passes it to the next in line.
This method configures the middleware in the correct order:
- Exception Handling: Catches unhandled exceptions and shows appropriate error pages.
- HTTPS Redirection: Redirects HTTP requests to HTTPS for security.
- Static Files: Serves CSS, JavaScript, images, and other static assets.
- Routing: Matches incoming requests to endpoints.
- Authentication: Determines who the user is based on cookies, tokens, or other credentials.
- Authorization: Determines what the user is allowed to do.
- Antiforgery: Validates tokens to prevent cross-site request forgery attacks.
- Security Headers: Adds headers that enhance security (Content-Security-Policy, X-Frame-Options, etc.).
- Blazor Components: Enables the Blazor Server component model.
- SignalR Hubs: Configures SignalR connections for real-time Blazor interactivity.
Again, this is configuration that would normally require careful ordering and many lines of code. IdentitySuite has done this work for you, ensuring the middleware is configured optimally for an authentication server.
Why So Simple?
You might wonder if this simplicity comes at the cost of flexibility. The answer is no—IdentitySuite uses sensible defaults that work for most scenarios, but you can customize nearly every aspect through configuration files. The three-method setup is intentionally minimal to get you started quickly, while the configuration system provides depth when you need it.
3.5 Configuration File Setup
After installing packages and configuring Program.cs, run the command:
dotnet build
a new folder appears in your project: IdentitySuite, containing the generated configuration files.
Step 5: Locate Configuration Files
Navigate to the IdentitySuite folder in your
project. You'll find files like:
IdentitySuiteSettings.Development.jsonIdentitySuiteSettings.Production.jsonIdentitySuiteSettings.Staging.json- Other environment-specific files used by the application
ASP.NET Core uses the ASPNETCORE_ENVIRONMENT
environment variable to determine which configuration file to load. By default, when you run locally with
dotnet run, the environment is "Development",
so the IdentitySuiteSettings.Development.json
file is used.
Step 6: Configure Your Connection String
Open the appropriate configuration file for your environment (typically
IdentitySuiteSettings.Development.json for
initial setup) in your text editor or IDE. You need to configure the connection string that tells IdentitySuite
how to connect to your database.
The file will contain a ConnectionStrings section.
You need to set the connection string that matches your chosen database provider.
For SQL Server (with LocalDB on Windows):
"IdentitySuiteOptions": {
  "Database": {
    "ConnectionStrings": {
      "SqlServerConnection": "Server=(localdb)\\mssqllocaldb;Database=IdentitySuiteDb;Trusted_Connection=true;",
      "PostgreSqlConnection": "",
      "MySqlConnection": ""
    },
    "Initialize": true,
    "ApplyMigrations": false
}
This connection string uses LocalDB, a lightweight version of SQL Server that's perfect for development. The
Trusted_Connection=true part means it uses
your Windows credentials to connect, so no username/password is needed.
For SQL Server (with SQL Server Express or full SQL Server):
"SqlServerConnection": "Server=localhost;Database=IdentitySuiteDb;User Id=sa;Password=YourStrongPassword123!;"
Replace localhost with your server name if it's
on a different machine, and use appropriate credentials. Never use the 'sa' account in production—create a
dedicated database user with minimal required permissions.
For PostgreSQL:
"PostgreSqlConnection": "Host=localhost;Database=identitysuitedb;Username=postgres;Password=YourPassword123!"
Adjust the Host,
Username, and
Password to match your PostgreSQL installation.
If you used the Docker command from earlier, this default configuration will work with
Password=YourPassword123! (or whatever password
you specified).
For MySQL/MariaDB:
"MySqlConnection": "Server=localhost;Database=identitysuitedb;Uid=root;Pwd=YourPassword123!;AllowUserVariables=true"
⚠️ Critical MySQL Requirement
Notice the AllowUserVariables=true parameter
at the end of the MySQL connection string. This is mandatory. Without it, the Pomelo MySQL
provider's caching system will fail, and you'll encounter errors when IdentitySuite tries to execute certain
database operations. This is not optional for MySQL/MariaDB.
Step 7: Enable Database Initialization
In the same configuration file, locate the
Initialize
setting and set it to true:
This tells IdentitySuite to automatically create and update the database when the application starts. For your first run, this is essential—it creates all the necessary tables, indexes, and seed data.
Configuration Tips
- • Only include the connection string for the database provider you installed
-
• Connection string names must match exactly:
SqlServerConnection,PostgreSqlConnection, orMySqlConnection -
• For production, use
IdentitySuiteSettings.Production.jsonwith production connection strings and certificate settings - • Never commit files containing production passwords to source control
3.6 Running the Application
With packages installed, Program.cs configured, and settings in place, you're ready to run IdentitySuite for the first time.
dotnet runThis starts the application and begins the initialization process. On the first run, several things happen behind the scenes, so it will take longer than subsequent starts.
Understanding the First Run Process
As your application starts for the first time, you'll see console output indicating various stages of initialization. Here's what's happening:
1. Application Startup
The .NET runtime loads, services are configured, and the application prepares to listen for HTTP requests.
2. Database Connection
IdentitySuite connects to your database using the connection string you provided. If this fails, you'll see an error message about the connection. Common issues include incorrect server names, wrong credentials, or the database server not running.
3. Applying Migrations
Since this is the first time the application runs, Entity Framework Core automatically applies all pending migrations to create the database schema. This process generates all the tables required for user management, client applications, tokens, and configuration. The number of migrations may look large, but this initialization happens only once and is completely normal.
4. Seeding Initial Data
After creating tables, IdentitySuite seeds the database with required initial data:
- Default Administrator Account: Email:
admin@IdentitySuite.local, Password:P@ssw0rd1234! - Default Roles: Administrator, User, and other built-in roles
- System Configuration: Default settings
5. Certificate Generation
Certificates are also generated during the first run. They are stored in the
Certificates folder within the project
directory, and a manifest file keeps track of each certificate along with its expiration date.
6. Server Ready
Finally, you'll see a message indicating the server is listening:
info: Microsoft.Hosting.Lifetime[14]
      Now listening on: https://localhost:5000
info: Microsoft.Hosting.Lifetime[14]
      Now listening on: http://localhost:5001
info: Microsoft.Hosting.Lifetime[0]
      Application started. Press Ctrl+C to shut down.
info: Microsoft.Hosting.Lifetime[0]
      Hosting environment: Development
The exact port numbers might differ, but you'll see both HTTP and HTTPS URLs. For security, always use the
HTTPS URL (the one starting with https://).
⏱️ First Run Takes Longer
The first startup may take a few seconds longer than usual—typically around 6–8 seconds on a normal machine, and potentially more on very slow hardware. This is expected. Subsequent launches are significantly faster (usually under one second to 2–3 seconds), since the database is already created, migrations are applied, and certificates have been generated. Let the initial startup complete without interruption.
3.7 Accessing IdentitySuite and First Login
With IdentitySuite running, it's time to access the admin interface and log in for the first time.
Step 11: Open Your Browser
Open a web browser and navigate to the HTTPS URL shown in your console output. Typically, this will be:
https://localhost:5000
If you're using a different port, use the URL shown in your console output.
Step 12: The Login Page
You'll now see the IdentitySuite login page. This is the same interface your users will encounter when signing in through IdentitySuite. The layout is clean, modern, and fully functional.
Step 13: Login with Default Credentials
Enter the default administrator credentials:
| Field | Value |
|---|---|
| Email / Username | admin@IdentitySuite.local |
| Password | P@ssw0rd1234! |
Type these credentials carefully—passwords are case-sensitive. Click the login button to authenticate.
🔐 Critical Security Warning
These default credentials are well-known and must be changed immediately. After your first login, navigate to the user management section and change the administrator password to something strong and unique. For production deployments, consider disabling or deleting this default account entirely after creating your own administrative users.
Never deploy to production with default credentials. Attackers know these defaults and will attempt to use them.
Step 14: Explore the Admin Interface
After successful login, you’ll land on the IdentitySuite administration area. From here you can access all the management sections that control users, applications, resources, and system configuration. The main menu gives you entry points to the core areas:
- Users & Roles: Manage user accounts, reset passwords, assign roles, and control access
- Applications, Resources & Scopes: Register client applications, define protected APIs, and configure OAuth/OpenID Connect scopes
- Configuration: Access the Theme Builder, Email Template Builder, and global configuration settings that shape the behavior and appearance of IdentitySuite
This is the central place where administrators configure how IdentitySuite authenticates users, issues tokens, and integrates with client applications.
✅ Installation Complete!
Congratulations! You now have a fully operational IdentitySuite authentication server. You’ve gone from zero to a production‑ready OpenID Connect provider in just a few minutes.
Your IdentitySuite instance is ready to authenticate users for your applications. In the next sections, we’ll register client applications and explore how to integrate IdentitySuite with your SPAs, APIs, and mobile apps.
4. Registering Your First Client Application
With your IdentitySuite server up and running, the next critical step is registering your first client application. A "client" in OAuth/OpenID Connect terminology is any application that needs to authenticate users through your IdentitySuite server—whether it's a single-page application, mobile app, or server-side web application.
In this section, we'll walk through registering a Single Page Application (SPA) client using the Authorization Code flow with PKCE—the recommended and most secure approach for modern web applications. This configuration will serve as the foundation for connecting your frontend applications to IdentitySuite.
What You'll Accomplish
By the end of this section, you'll have registered a client application in IdentitySuite that's ready to authenticate users. We'll focus on the server-side configuration here—for detailed implementation guides on connecting specific frameworks (Angular, React, Blazor WebAssembly), refer to our comprehensive article Authentication Made Easy with IdentitySuite .
4.1 Understanding Client Registration
Before we dive into the mechanics of registration, let's understand what we're actually configuring. Client registration is the process of telling IdentitySuite about an application that will use it for authentication. This registration establishes a trust relationship and defines the security parameters for how the client can interact with your authentication server.
The Trust Relationship
When you register a client, you're essentially answering several critical questions:
- Who is this client? You assign a unique Client ID that identifies this application across your entire authentication ecosystem.
- What type of application is it? Different application types (SPA, native mobile, server-side) have different security characteristics and require different authentication flows.
- Where can authentication responses be sent? Redirect URIs specify exactly where IdentitySuite is allowed to send users after authentication—a critical security measure to prevent token theft.
- What information can it access? Scopes define what user information and API access the client is permitted to request.
Why Configuration Matters
Proper client configuration is fundamental to your security posture. A misconfigured redirect URI could allow an attacker to intercept authentication tokens. Overly broad scope permissions could give applications access to data they don't need. IdentitySuite's client registration interface guides you through these critical decisions with sensible defaults and clear explanations.
4.2 Creating a Single Page Application Client
Let's walk through the process of registering your first SPA client. This example demonstrates the workflow you'll follow for any client application, with specific settings optimized for single-page applications built with frameworks like Angular, React, or Blazor WebAssembly.
Step 1: Access the Applications Management Interface
From the IdentitySuite admin interface, navigate to Applications/Resources in the main menu, then select Applications. This takes you to the applications management area where you can view all registered clients and create new ones.
Click the Add button to start the client registration wizard.
Step 2: Choose the Client Type
The first step in the wizard asks you to choose a client type. This selection determines the default configuration settings that will be applied—optimizing security and functionality for your specific application scenario.
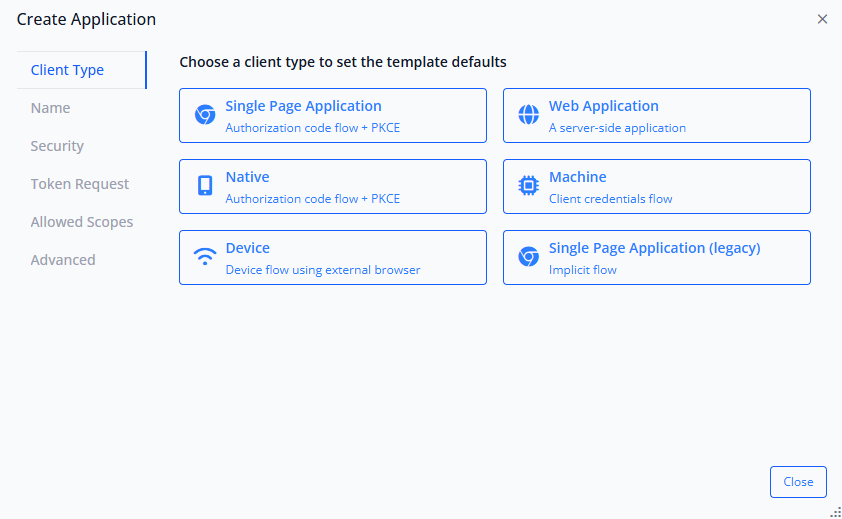
For modern single-page applications, select Single Page Application. This option configures the client to use the Authorization Code flow + PKCE, which is the current security best practice for public clients like SPAs.
⚠️ Avoid Legacy Options
You'll notice a "Single Page Application (legacy)" option that uses the Implicit flow. This flow is deprecated in OAuth 2.1 due to security vulnerabilities and should not be used for new applications. Always choose the standard "Single Page Application" option which implements Authorization Code + PKCE.
Step 3: Configure Client Identity
After selecting the client type, you'll configure the basic identity information for your client application.
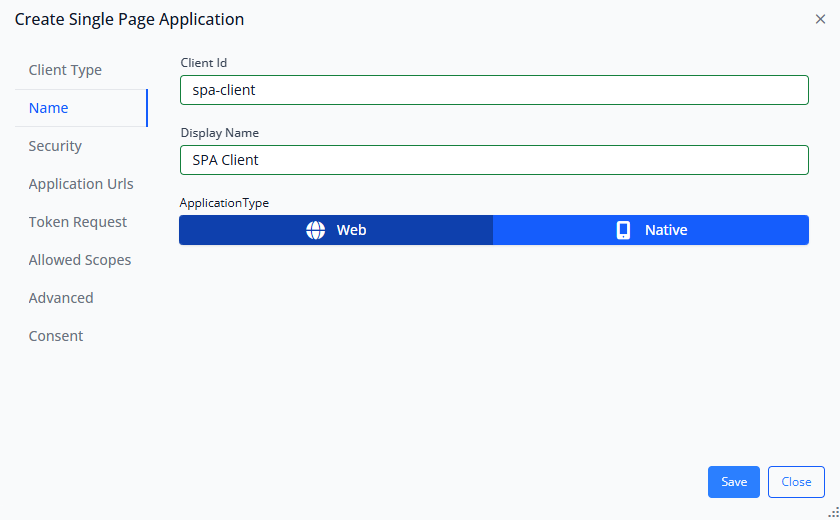
Client ID:
This is the unique identifier for your application. It should be descriptive and follow a consistent naming
convention if you're managing multiple clients. Examples:
my-app-frontend
, customer-portal,
admin-dashboard.
The Client ID will be used in your application's OIDC configuration. It's public information (not a secret), so it doesn't need to be cryptographically complex, but it should be meaningful and unique within your IdentitySuite instance.
Display Name:
This is a human-readable name that appears in the admin interface and on consent screens. Use something your users will recognize, like "My Application" or "Customer Portal".
Application Type:
For SPAs, this is automatically set to Web based on your client type selection. This indicates that your application runs in a web browser rather than as a native mobile or desktop application.
Step 4: Security Configuration
The Security tab contains critical authentication settings. For SPA clients, IdentitySuite has already configured these with secure defaults, but let's understand what they control.
Client Type: Public
SPAs are classified as "public" clients because they run entirely in the browser where all code is visible to users. This means they cannot securely store secrets. The Authorization Code + PKCE flow is specifically designed for public clients, using dynamically generated code verifiers instead of static secrets.
Consent Type: Explicit
This controls when users see consent screens. For SPAs, the default is "Explicit," which means users will see a consent screen during authentication to approve the scopes being requested. "Systematic" handles consent automatically for first-party applications (your own apps), "External" is for third-party applications, and "Implicit" bypasses consent entirely (use with caution, typically only for fully trusted internal applications).
💡 Default Settings Are Secure
IdentitySuite's default security settings for SPAs follow OAuth 2.1 best practices. Unless you have specific requirements that necessitate changes, these defaults provide the right balance of security and user experience. The security tab is pre-configured correctly—you typically won't need to modify anything here for standard SPA scenarios.
Step 5: Configure Application URLs (Critical Step)
This is the most important configuration step for your client. The Application URLs define exactly where IdentitySuite is allowed to redirect users during the authentication flow.
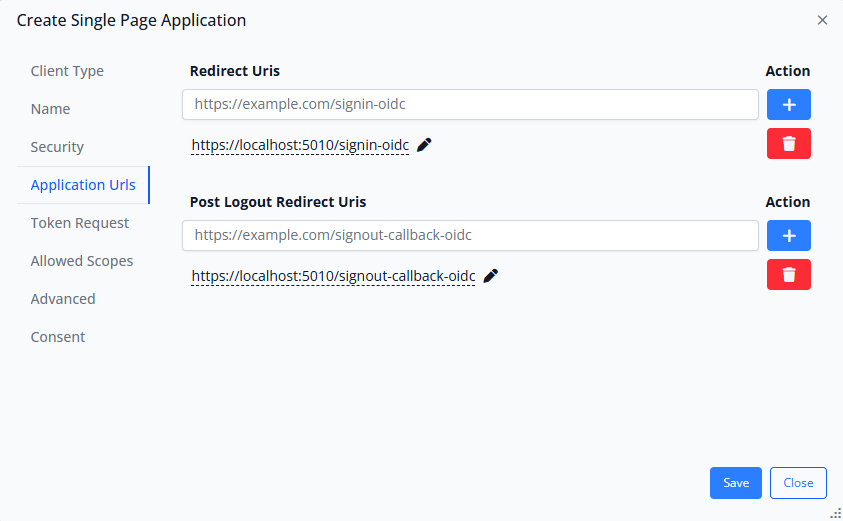
Redirect URIs:
These URLs specify where IdentitySuite can send users after successful authentication. When a user completes login, IdentitySuite redirects them back to your application at one of these URLs with an authorization code that your app exchanges for tokens.
For local development, you'll typically use
http://localhost:PORT/signin-oidc
or
http://localhost:PORT/authentication/login-callback
(the exact path depends on your OIDC library's
conventions).
For production, you'll add your actual domain:
https://app.yourdomain.com/signin-oidc
🔒 Security Critical: Exact Matching Required
Redirect URIs must match exactly—including protocol (http vs https), port numbers, and paths. IdentitySuite enforces strict matching to prevent open redirect vulnerabilities. If an authentication request specifies a redirect URI that isn't registered here, IdentitySuite will reject it.
This is by design and is a critical security feature. Never use wildcards or patterns in redirect URIs. Register each exact URL your application will use.
Post Logout Redirect URIs:
Similar to redirect URIs, these specify where users can be sent after logging out. This ensures that when users click "logout" in your application, they're returned to a safe, expected location rather than being stuck on IdentitySuite's logout confirmation page.
Typically, you'll redirect users to your application's home page or a dedicated "you've been logged out" page:
http://localhost:PORT/ for development,
https://app.yourdomain.com/ for production.
Step 6: Configure Token Request Settings
The Token Request tab controls which OAuth grant types and response types your client can use. For SPAs, IdentitySuite has pre-configured these settings to implement the Authorization Code + PKCE flow securely.
Grant Types:
- AuthorizationCode: Enabled by default. This is the primary flow for SPAs, where the client receives an authorization code and exchanges it for tokens.
- RefreshToken: Typically enabled for SPAs to allow obtaining new access tokens without re-authentication, improving user experience.
Response Types:
- Code: Enabled by default. This indicates that the authorization endpoint returns an authorization code (not tokens directly), which is then exchanged for tokens via the token endpoint.
Requirements:
- ProofKeyForCodeExchange (PKCE): Enabled and enforced by default for SPAs. This requirement ensures that every authorization code flow from this client includes PKCE protection.
- PushedAuthorizationRequests: An additional security feature (optional) that enhances security by pushing authorization parameters directly to the server rather than including them in redirect URLs.
✅ Defaults Are Correct
The Token Request settings are pre-configured optimally for SPAs. You'll rarely need to change anything here. The combination of AuthorizationCode grant type, Code response type, and PKCE requirement implements the most secure authentication flow for public clients. These settings align with OAuth 2.1 specifications and current security best practices.
Step 7: Select Allowed Scopes
Scopes define what user information and API access your client application is permitted to request. When users authenticate, your app can request specific scopes, and IdentitySuite will only grant access to scopes you've enabled here.
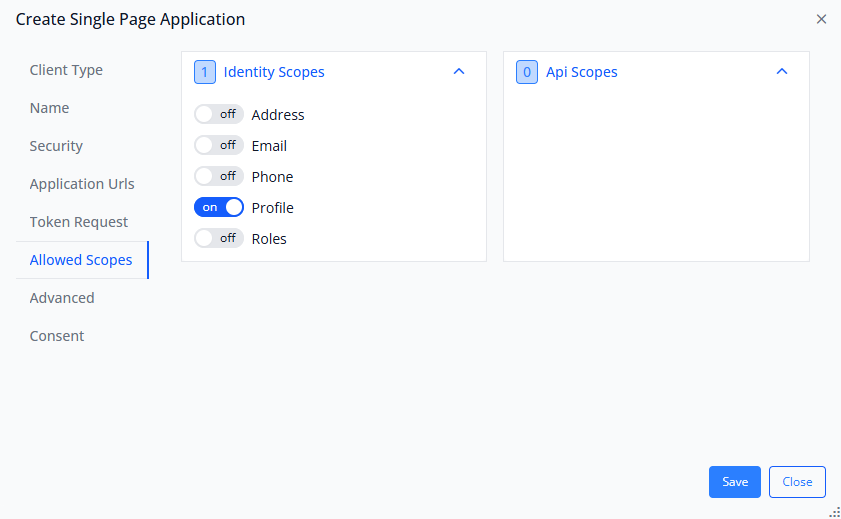
Identity Scopes:
These are standard OpenID Connect scopes that provide access to user profile information:
- openid: Required for OpenID Connect. Always enable this—it's the foundation scope that indicates you want to authenticate the user (not just authorize access to resources).
- profile: Grants access to basic profile information (name, username, etc.). Typically enabled for most applications.
- email: Grants access to the user's email address. Enable if your application needs to display or use the user's email.
- phone: Grants access to phone number. Enable only if your application specifically needs this.
- address: Grants access to physical address information. Less commonly used.
- roles: Grants access to user role assignments. Enable if your application implements role-based access control.
API Scopes:
If you've defined custom API resources in IdentitySuite, their associated scopes will appear here. API scopes grant access to specific backend APIs or resource servers. For a basic setup, you might not have any custom API scopes yet—that's fine. You can add them later as your architecture evolves.
Principle of Least Privilege
Only enable scopes that your application genuinely needs. This follows the security principle of least privilege—applications should request only the minimum permissions necessary to function. If your app doesn't need phone numbers, don't enable the phone scope. This limits the potential impact if your application is ever compromised.
Typical Scope Configuration for SPAs:
For most single-page applications, you'll want to enable:
openid(required)profile(for basic user info)email(if you display/use email)roles(if you use role-based authorization)
Step 8: Review Advanced Settings
The Advanced tab contains additional configuration options for endpoints, properties, and token lifetimes. For most applications, the default settings are appropriate and don't require modification.
Endpoints:
Controls which OIDC endpoints are enabled for this client (Authorization, Token, EndSession, Introspection, etc.). The defaults enable all necessary endpoints for a standard SPA authentication flow.
Properties:
Allows adding custom key-value properties to the client registration. This is useful for storing metadata or configuration that your application might need, but isn't required for basic functionality.
Lifetimes:
Controls how long various tokens remain valid. The defaults balance security (shorter is better) with user experience (longer means less frequent re-authentication). Access tokens typically have short lifetimes (minutes), while refresh tokens can last days or weeks.
When to Modify Advanced Settings
Most applications work perfectly with default advanced settings. Consider modifying these settings only when:
- • You have specific security requirements that mandate shorter token lifetimes
- • You need to disable certain endpoints for compliance or security reasons
- • You're implementing advanced scenarios like device authorization flows
- • You need to store custom metadata with the client registration
Step 9: Save the Client Configuration
After configuring all the necessary settings, click the Save button at the bottom of the dialog. IdentitySuite validates your configuration and registers the client in the database.
If there are any validation errors (such as invalid redirect URIs or missing required fields), IdentitySuite will display clear error messages. Correct any issues and save again.
✅ Client Registration Complete!
You've successfully registered your first client application with IdentitySuite. Your SPA can now use this client configuration to authenticate users through your IdentitySuite server.
The next step is configuring your actual application code to connect to IdentitySuite using these settings. We'll cover that in the next section.
4.3 Understanding Client Configuration Sections
Now that you've registered a client, let's take a moment to understand the complete picture of what each configuration section controls. This knowledge will help you troubleshoot issues and customize configurations for different application scenarios.
The Client Type Section
This is your starting point—choosing the right client type sets up all the other defaults appropriately. IdentitySuite offers several client type templates:
- Single Page Application: For browser-based apps (Angular, React, Vue, Blazor WASM). Uses Authorization Code + PKCE. Public client (no secrets).
- Web Application: For server-side rendered apps (ASP.NET MVC, Node.js/Express, Django). Uses Authorization Code flow. Confidential client (can store secrets).
- Native: For mobile apps (iOS, Android, React Native, Flutter). Uses Authorization Code + PKCE with platform-specific redirect URI schemes. Public client.
- Machine: For service-to-service authentication (microservices, backend processes). Uses Client Credentials flow. Confidential client.
- Device: For devices with limited input capabilities (smart TVs, IoT devices). Uses Device Authorization flow.
Each template configures grant types, response types, and security requirements appropriate for that application pattern, saving you from having to understand all the OAuth specification details.
The Name Section
Beyond the Client ID and Display Name we configured earlier, this section also includes:
- Application Type: Web or Native, determining how the application is treated in terms of capabilities and platform-specific features.
These basic identity fields are referenced throughout the admin interface and in logs, making them important for operational management of multiple clients.
The Security Section
This section defines the fundamental security posture of the client:
- Client Type (Public vs Confidential): Public clients run in environments where code is visible (browsers, mobile apps) and cannot securely store secrets. Confidential clients run on servers where secrets can be protected. This distinction is crucial—using the wrong type compromises security.
- Consent Type: Controls when users see consent screens:
- • Systematic: Automatic for first-party apps, explicit for third-party
- • Explicit: Always show consent screens
- • External: For third-party integrations
- • Implicit: Never show consent (use cautiously)
- Client Secret: For confidential clients only. This is a cryptographic secret that the client must present when requesting tokens, proving its identity. Public clients don't have secrets (they use PKCE instead).
The Application URLs Section
We covered this in detail during registration, but it's worth emphasizing again: redirect URI configuration is the most security-critical aspect of client registration. These URIs are the only places IdentitySuite will send authentication responses.
Best practices for redirect URIs:
- Always use HTTPS in production (HTTP is acceptable for localhost development only)
- Be as specific as possible—avoid wildcard patterns
- Register separate URIs for each environment (dev, staging, production)
- Use consistent paths across all environments for easier configuration management
- Document your redirect URI patterns in your application's deployment guide
The Token Request Section
This section defines the OAuth flows and mechanisms available to this client. Understanding grant types helps you troubleshoot authentication issues:
Common Grant Type Combinations:
| Client Type | Grant Types | PKCE Required |
|---|---|---|
| SPA | AuthorizationCode, RefreshToken | ✅ Yes |
| Web App | AuthorizationCode, RefreshToken | ⚪ Optional (but recommended) |
| Native/Mobile | AuthorizationCode, RefreshToken | ✅ Yes |
| Service/Machine | ClientCredentials | ❌ N/A (uses client secret) |
The Response Type setting works in conjunction with grant types. For Authorization Code flows, you'll use the
code response type. The requirements section
enforces additional security measures like PKCE.
The Allowed Scopes Section
Scopes are the authorization layer on top of authentication. While authentication answers "who are you?", scopes answer "what are you allowed to access?"
When your application requests authentication, it includes a list of desired scopes. IdentitySuite checks if those scopes are enabled for the client, and if the user consents (when required), includes them in the issued tokens.
This permission model allows you to run multiple applications against the same IdentitySuite server with different
access levels. For example, your customer-facing app might only get
profile
and email, while your admin
dashboard also gets roles and access to management APIs.
The Advanced Section
This section provides fine-grained control over endpoints, custom properties, and token lifetime policies:
Endpoints Control:
Each OIDC endpoint can be enabled or disabled per client. Most clients need Authorization, Token, and EndSession. The Introspection endpoint is useful for resource servers that need to validate tokens. Device Authorization is for limited-input devices. Revocation allows clients to explicitly invalidate tokens.
Token Lifetimes:
Different types of tokens have different lifetime requirements:
- Access Tokens: Short-lived (minutes to an hour). Compromised access tokens have limited impact because they expire quickly.
- Refresh Tokens: Longer-lived (days to weeks). Allow obtaining new access tokens without re-authentication, improving UX while maintaining security through rotation.
- Authorization Codes: Very short-lived (typically under a minute). They're intermediate credentials used only during the authentication flow.
- ID Tokens: Short-lived, similar to access tokens. They verify identity but aren't used for ongoing API access.
Balancing Security and User Experience
Token lifetime configuration is a trade-off between security (shorter is better—limits exposure window) and user experience (longer is better—less frequent re-authentication). The defaults strike a good balance, but high-security environments might prefer even shorter access token lifetimes, while consumer applications might extend refresh token lifetimes to reduce login friction.
The Consent Section
The Consent tab (not covered in detail during our walkthrough) allows you to configure pre-authorized scopes and customize the consent experience. Pre-authorization means certain scopes can be granted without showing a consent screen, useful for first-party applications where explicit consent would be redundant.
4.4 Verifying Your Client Configuration
With your client registered, you can verify the configuration is correct before implementing the actual application integration.
Check the Discovery Document
IdentitySuite exposes all its OIDC endpoints and configuration through a standardized discovery document. Open your browser and navigate to:
https://localhost:5000/.well-known/openid-configurationThis JSON document contains all the information client libraries need to configure themselves automatically, including endpoint URLs, supported grant types, scopes, and signing algorithms. Verify that it's accessible and returns valid JSON—this confirms your IdentitySuite server is properly configured for OIDC.
Review the JWKS Endpoint
The JSON Web Key Set (JWKS) endpoint publishes the public keys used to validate tokens. Navigate to:
https://localhost:5000/.well-known/jwksYou should see JSON containing key information. This confirms that your signing certificates are properly configured and published. Client applications and resource servers will use these keys to validate tokens without needing to contact IdentitySuite for every validation.
Next Step: Implement Client Application
With your client registered and verified in IdentitySuite, the server-side configuration is complete. The next step is implementing the OIDC integration in your actual application code.
📚 Detailed Implementation Guides
For comprehensive, framework-specific guides on implementing the client-side OIDC integration, including complete working code examples for Angular, React, and Blazor WebAssembly, refer to our dedicated article:
Authentication Made Easy with IdentitySuite →
That guide provides step-by-step instructions for configuring OIDC client libraries, handling authentication flows, managing tokens, and implementing protected routes in your chosen framework.
5. Conclusion
Congratulations on completing this comprehensive journey through IdentitySuite! You've progressed from understanding what IdentitySuite is and why it exists, through its architectural foundations, to successfully deploying your own authentication server and registering your first client application.
What You've Accomplished
Let's recap the significant milestones you've achieved:
- Understanding Modern Authentication: You've learned why OpenID Connect and OAuth 2.0 matter, how they secure modern applications, and why the Authorization Code + PKCE flow is the gold standard for SPAs and mobile apps.
- Architectural Knowledge: You understand how IdentitySuite leverages Openiddict, ASP.NET Core Identity, and Blazor Server to provide enterprise-grade authentication without the complexity typically associated with implementing these standards from scratch.
- Hands-On Deployment: You've installed IdentitySuite, configured it with your chosen database, and witnessed the automatic database initialization, migration application, and certificate generation processes that make IdentitySuite production-ready out of the box.
- Operational Expertise: You've navigated the admin interface, understood the security implications of various configuration options, and registered a client application with appropriate security settings.
- Security Awareness: Throughout this guide, you've learned security best practices—from proper certificate management to redirect URI validation, from PKCE requirements to scope-based authorization.
Your IdentitySuite Foundation
What you have now is more than just a running server—you have a production-ready authentication infrastructure that can:
- Authenticate users for any application that speaks OpenID Connect or OAuth 2.0
- Scale from development to enterprise production environments
- Support modern authentication methods including passkeys
- Enforce security best practices automatically through sensible defaults
- Grow with your needs through extensive configuration and customization options
This foundation is solid enough for production use while remaining flexible enough to adapt as your requirements evolve.
Next Steps on Your Journey
While you now have a working authentication server and registered client, your journey with IdentitySuite is just beginning. Here's where to go next:
Immediate Next Steps
- Implement Client Integration: Follow our detailed guide Authentication Made Easy with IdentitySuite to connect your Angular, React, or Blazor WebAssembly application to your IdentitySuite server.
- Change Default Credentials: If you haven't already, immediately change the default administrator password and consider creating separate administrative accounts for each team member.
- Test the Complete Flow: Walk through a complete authentication cycle with your integrated application—login, access protected resources, token refresh, and logout.
- Configure Production Settings: Review your
IdentitySuiteSettings.Production.jsonfile, configure production database connections, and plan your certificate management strategy for production.
Deeper Exploration
As you become more comfortable with IdentitySuite, explore these advanced capabilities:
- Custom Scopes and Resources: Define your own API resources and scopes to protect your backend services with IdentitySuite-issued access tokens.
- Role-Based Access Control: Implement sophisticated authorization patterns using roles and claims to control what authenticated users can access.
- Multi-Factor Authentication: Enable additional authentication factors to enhance security for sensitive applications.
- Passkey Implementation: Explore passwordless authentication using passkeys for the ultimate balance of security and user experience.
- External Identity Providers: Configure social login (Google, Microsoft, etc.) or enterprise SSO (SAML, Azure AD) to allow users to authenticate with existing credentials.
- Custom Branding: Customize the look and feel of IdentitySuite's login and consent pages to match your brand identity.
- Monitoring and Logging: Implement comprehensive logging and monitoring to track authentication events, detect security issues, and troubleshoot problems.
Resources for Continued Learning
The IdentitySuite documentation is your primary resource for detailed configuration options, troubleshooting guides, and advanced scenarios:
Explore the Complete Documentation →
The documentation includes:
- Configuration reference for all settings and options
- Security best practices and hardening guides
- Deployment guides for various hosting environments
- Troubleshooting common issues
- Integration guides for specific frameworks and platforms
- API reference for programmatic configuration
The Road Ahead
Authentication is fundamental to every application, but it shouldn't be a barrier to building great products. IdentitySuite removes that barrier by providing enterprise-grade authentication that just works, allowing you to focus on delivering value to your users rather than wrestling with OAuth specifications and security vulnerabilities.
As your applications grow—from a single SPA to a complex ecosystem of web apps, mobile apps, and microservices—IdentitySuite grows with you. The authentication server you deployed today can scale to serve millions of users while maintaining the same security standards and consistent architecture.
You're Ready to Build
You now have the knowledge and tools to implement secure, standards-compliant authentication for your applications. Your IdentitySuite server is running, your first client is registered, and you understand the architecture that makes it all work.
The next code you write will authenticate real users, protect real resources, and provide real security. That's powerful—and with IdentitySuite, it's also straightforward.
Thank you for investing your time in learning IdentitySuite. We're excited to see what you build with it.
Continue Your IdentitySuite Journey
Implement Client Integration
Ready to connect your SPA? Follow our step-by-step guide with complete code examples for Angular, React, and Blazor WebAssembly.
Authentication Made Easy GuideExplore the Documentation
Dive deeper into advanced features, configuration options, and deployment strategies in our comprehensive documentation.
View DocumentationHave questions or need support? Our team is here to help you succeed with IdentitySuite.
Contact Support
About IdentitySuite
IdentitySuite simplifies enterprise authentication for .NET developers. Built on proven technologies like ASP.NET Core Identity and Openiddict, we eliminate the complexity of OAuth 2.0 and OpenID Connect implementation while maintaining enterprise-grade security standards.